Closed Captioned For The Thinking Impaired

Friday, February 24, 2023

Keto Cauliflower-Shiitake Mushroom-Sweet Potato Gratin


Gratin is the culinary technique in which an ingredient is topped with a caramelized crust, often using breadcrumbs, grated cheese, egg or butter. The term may be applied to any dish made using this method. Gratin is usually prepared in a shallow oven-safe dish. 

The etymology of gratin is from the French language words gratter, meaning "to scrape" or "to grate" (for example, "scrapings" of bread or cheese), and gratiné, from the transitive verb form of the word for crust or skin. The technique predates the current name  which did not appear in English until 1846.

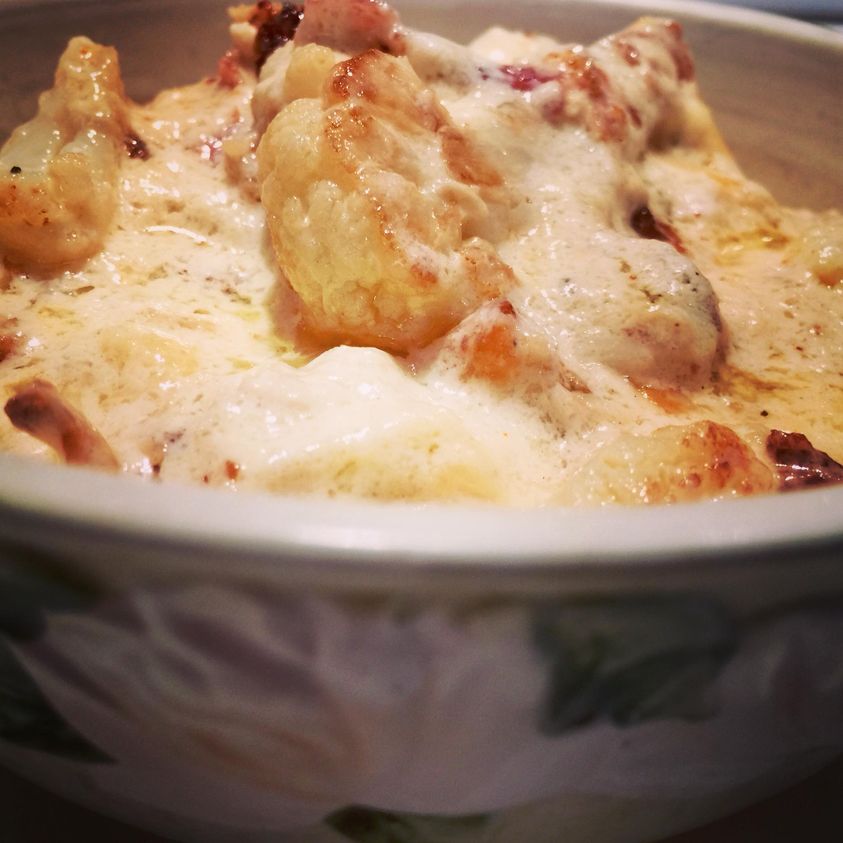
In addition to the well-known potato dishes such as gratin dauphinoisgratin may be applied to many other bases of meat, fish, vegetables, or pasta. Cauliflower, sweet potato, and shiitake mushrooms are excellent candidates for this treatment and also what I happened to have in ye olde cupboards. Whilst sweet potatoes are not strictly keto with the average sweet potato containing 37 grams of carbs (minus 5 grams of fiber), if you split this dish amongst two or more people, it's still a low-carb meal. I eschewed adding crumbs atop the casserole, but you can certainly add crumbled pork rinds or any low-carb cracker crumb topping for extra crunch - I opted for more cheese, instead. If you don't have a convection oven like I do, you may need to stick the gratin dish under the broiler for a minute to crisp the top properly to a golden brown. 

This is a succulent and decadent casserole, do not let its gluten-free nature fool you. It beats Baked Mac and Cheese like a rented mule and is pure silk in mouthfeel because of the lack of flour in the cheese sauce. It reheats like a dream, too, not that there are ever any leftovers when el esposo is done cleaning up the kitchen;)


Keto Cauliflower-Shiitake Mushroom-Sweet Potato Gratin


Note: Instead of a traditional bechamel, I use sour cream and Boursin as thickening agent to help the cheese bind. Instead of blanching the cauliflower and sweet potato before immersing in the cheese sauce and baking, I saute the veggies with the aromatics and simmer them with the liquids —cooking it all in one pot before baking makes the gratin more nutritious and flavor-packed.  Of course, it’s a rich sauce. Only use full fat dairy. You can play with different cheese combinations... Mascarpone, Gruyere, Comte, Fontina, Gorgonzola, Parmigiano-Reggiano etc etc in any combination would work great. The idea is to have a trifecta of yummy mix that includes a good melting cheese with a good creamy cheese with a strongly flavored cheese. This recipe will serve two as a main course, or 4-6 as a side dish.


Ingredients:


1 head of fresh cauliflower - washed, dried, and separated into florets

1 medium sweet potato - scrubbed, dried, and cut into coins that are 1/4” thick

1 small onion, sliced fine

2 garlic cloves, sliced fine

4 oz. shiitakes, de-stemmed & sliced

2 oz. pancetta (or thick cut bacon), diced thickly

1 small wheel of shallot-chive boursin (5 oz)

3 oz of gruyere, shaved with a plane (or coarsely grated)

2 TBSP sour cream

1 TBSP unsalted butter

2 TBSP extra virgin olive oil

1/4 cup of white wine

1/4 cup of stock (chicken or vegetable)

1/4 cup half and half (or cream)

freshly milled black pepper (to taste)

truffle oil (to taste)

1 sprig of thyme (leaves only, finely minced)

tsp of Dijon mustard (optional)

1 - 8 x 8 gratin dish

1 Dutch oven   


Instructions:


Preheat your oven (with the convection fan if you have one***) to 375 degrees

Heat a dutch oven over medium heat, add olive oil and butter, when hot but not smoking, add onions, saute until translucent (about 3 minutes), then add pancetta, saute with onions until fat begins to render, then add cauliflower florets, stirring well, adding more olive oil if pan seems dry, then add shiitakes, sweet potato coins and sliced garlic, incorporating well with the rest.

I sauté the veggies in olive oil and butter with pancetta, onion, garlic and shiitakes until both vegetables lose their raw look, absorb flavor, and take on a little golden color - then I deglaze the pan with a little white wine, add a few generous splashes of stock and half and half, lower the heat to a bare simmer and cover the pot tightly with a well-fitted lid for 15 minutes or so until the veggies have absorbed most of the liquid.

Then I add the sour cream and boursin mixing well, season it with freshly milled black pepper, and chopped scallions, dijon, and thyme, pour it all into a small (8x8) gratin dish, top it with a layer of freshly grated gruyere, mix the grated cheese in, finish it with another layer of freshly grated gruyere, drizzle some truffle oil on top and pop it into a preheated 350 F degree convection oven for 30 minutes, until the top is golden and the casserole is bubbling.

***If you don’t have a convection oven, you may need to place the dish under the broiler for a minute, to get a golden crust. Buen provecho.


Saturday, May 8, 2021

Keto Asparagus Ricotta Tart


It’s so funny. I told el esposo I wanted to blog this tart for Mother’s Day because it might be a nice brunchy item for people to share with their moms and he said, “But you hate your mother - she was terrible to you!” It never occurred to me that my mother had anything to do with it. Most people love their mothers, as it should be, and it makes me happy to know others do. What happened to me with mine has in no way affected my sentiments about others celebrating the day. Is that crazy of me? Probably. Well, crazy or not... here we go. This tart is not only keto, but it offers all the best that spring brings to the table. A great sort of ad-lib I created with ingredients I had in the pantry and fridge for our Thursday Night Vegetarian Meal. I made up the recipe as I went along, but it came out well:


 Keto Asparagus Ricotta Tart


You can, of course, substitute shallots or onions for the leeks and leave out the fennel. You can also use puff pastry or a pre-made crust, if you are not on the ketogenic diet. You can use fresh cherry tomatoes, instead of sun-dried tomatoes... 


Ingredients:

  • 1 fathead pizza crust - rolled into a 13 x 9 inch rectangle (Click here for recipe)
  • 1 lb of ricotta
  • 1 large egg
  • a half handful of mixed herbs: basil (I used Thai basil, but regular basil is fine), thyme and oregano leaves, finely chopped (or use pesto) 
  • a grating of nutmeg (about 1/4 teaspoon)
  • white pepper (pinch)
  • 1/4 cup drained and rough chopped oil-packed sun-dried tomatoes
  • sliced shallots and fennel bulb, sauteed until caramelized (1 shallot and 1 fennel bulb)
  • 1/2 bunch large asparagus spears (about 10-12)
  • 1-2 tbsp oil from the sun-dried tomato jar
  • 1-2 tbsp extra virgin olive oil
  • zest of 1 small lemon (optional)
  • shaved parmesan, to taste (about 1/3 cup)
  • chives (optional) 

Instructions:

1) Saute shallots and fennel bulb over medium heat until golden, deglaze pan with a splash of chardonnay, when all pan fond is scraped and incorporated and wine is reduced, add herbs. Remove from pan and set aside.

2) Make and roll out the fathead pizza dough. Press into small parchment-lined rectangular baking pan or place free-form on a parchment-lined baking sheet or pizza stone, dock the dough with fork tines allover, and blind-bake for 8 minutes at 400 degrees in a pre-heated oven.

3) In the same pan you used to cook the shallot and fennel, add trimmed asparagus spears (10-12 large), add 2 tablespoons of sundried tomato oil & a tablespoon of extra-virgin olive oil, mix well, then add to the oven on the rack below baking tart dough for 5 minutes.

4) Mix the ricotta with half the shaved parmesan. Crack in the egg, add nutmeg, white pepper and mix well. Sprinkle the sun-dried tomatoes, sauteed shallots and fennel bulb and mix well.

5) Remove tart dough and asparagus from oven. Add the ricotta mixture to the pre-baked tart dough. Arrange the asparagus spears nicely on top. Season the asparagus with the remainder of parmesan and pepper.

6) Bake the tart for about 15-20 minutes until the crust is golden. If the asparagus looks dry, brush with additional oil. Sprinkle with lemon zest and chives on top. Enjoy!


Happy Mother's Day! 


Wednesday, March 24, 2021

Ketolicious Millionaire's Shortbread


As those three of you who read this blog can see, I've been on a mission lately to combine el esposo's favorite two dessert flavors: chocolate and peanut butter in a variety of ways. Otherwise he just sits with a spoon and mindlessly eats out of the 40 oz. sugar-free peanut butter jar & then dumps 1/2 cup of sugar-free chocolate chips in a dish and eats those. Combining them into a dessert makes him more aware that he is in fact eating dessert and therefore he eats less. Portion-control is key to weight-loss and maintenance. So... since he is also a fan of those dreadful Atkins peanut butter bars, I decided to conjure up a much more fulfilling version and Millionaire shortbread came to mind. 

A relatively modern twist on the more traditional Scottish shortbread, Millionaire’s Shortbread follows the Scottish tradition of making a traybake (a dessert baked in a tray to be sliced and shared after cooking). Using the traditional buttery shortbread as a base, Millionaire’s Shortbread adds lush layers of caramel and chocolate atop the shortbread—a decadent treat. 

I combined about four different recipe ideas and condensed them into one! There are many ways to go about making the dish, all of them great, but since el esposo hates caramel and loves peanut butter I subbed in peanut butter with Lakanto keto "maple" syrup , a little cream cheese, and coconut oil in place of the usual sugar-free caramel sauce. It worked beautifully. Almond butter or even tahini sauce would also work, if you're allergic to peanuts. 

So, this is a simple dish but a little laborious. First you will bake the crust, let it cool, then stick it in the freezer to further firm up for 10 minutes before adding the peanut butter caramel layer, after adding that layer, you will firm it up in the freezer for 10-15 minutes again, then you will add the chocolate ganache over that and freeze it all for 10 minutes. When the chocolate is set? It's ready to eat, but cutting it requires care. Use a large knife that you have wet with hot water, wipe the knife, and cut the bar in half, wet, wipe repeat... until you get 16 pieces. try not to saw the pieces, try to use the entire blade of the knife (a 10 or 12 inch chef's knife worked for me) and press downward evenly from the tip to the hilt in one sure steady downward stroke using your bodyweight. This will prevent the chocolate and the shortbread from cracking and crumbling:


 There are no-bake versions of the crust, but those would be a mealy mess. Baking the shortbread gives an aroma and texture that is worth the trouble. Take the time to do it right. You're combining all the same ingredients and pressing them into a parchment lined dish anyway, so just go ahead and take the little extra time to bake and cool the shortbread, rather than just freezing it for ten minutes to firm up. These bars will store in the fridge for two weeks or the freezer for three months. I do not recommend storing them at room temperature for any length of time. The chocolate ganache will melt. 


Ketolicious Millionaire's Shortbread 


Note: Do be sure to soften the butter, cream cheese, peanut butter, melt the coconut oil (microwave everything individually for 20-30 seconds, if you're in a hurry) and have everything else at room temperature before combining the ingredients. I used a mixing bowl and arm power to combine everything but you can use a food processor, instead. 

I don't microwave the sugar-free chocolate chips, I melt them with 3 tablespoons of coconut oil in a small heavy-bottomed sauce pan over low heat, stirring constantly with a silicon spatula, but you can nuke them instead. I just like stirring the pot. It soothes me. 

Preheat your oven to 355 degrees. Gather all your ingredients, measuring spoons, and cups, whisks and bowls including an 8x8 or 9x9 square dish which you will line with parchment paper. You will make the crust, then the peanut butter caramel, then the chocolate ganache. 

Each bar has about 312 calories and 2 net carbs. 

Let the madness begin!


For the sugar-free shortbread crust

Ingredients:
  • 1/3 cup coconut flour
  • 2/3 cup superfine almond flour
  • 1/4 cup granulated erythritol (Swerve)
  • 8 drops stevia
  • 1 stick butter (softened) (1/2 cup)
  • 1 tsp vanilla extract
  • 1/4 tsp baking powder
  • 1/4 tsp psyllium husk (or xanthum gum)


Instructions:
  • Preheat the oven to 355 Fahrenheit.
  • Whisk your dry ingredients until well-combined.
  • Add the softened butter, vanilla/almond extract and stevia and mix with a flexible spatula until you have a smooth dough.
  • Press the dough evenly into your parchment-lined baking dish.
  • Place the dough in the freezer for 10 minutes.
  • This will harden the butter and provide for a more tender pastry.
  • Place baking dish in the preheated oven for 15 minutes or until the crust smells fragrant and has a slightly golden top.
  • Allow to cool completely, then place in the freezer for 10 minutes.
  • While crust is cooling prepare your peanut butter caramel  


For the sugar-free peanut butter caramel layer

Ingredients:
  • 1 cup peanut butter
  • 1/2 cup Lakanto sugar-free maple syrup
  • 1/4 cup melted coconut oil
  • 2 Tablespoons softened cream cheese
  • 2 tsp vanilla extract
  • 1/4 tsp salt


Instructions:

  1. Add peanut butter, maple syrup, coconut oil, cream cheese, vanilla extract, and salt to a bowl. Mix together with flexible spatula until combined, or whir together in a food processor. 
  2. Remove baking dish from the freezer.
  3. Spread caramel evenly across the shortbread layer.
  4. Place in the freezer for 10 minutes.


For the chocolate ganache

Ingredients:

  • 1 cup of sugar-free chocolate chips
  • 3 Tablespoons of coconut oil


Instructions:

  1. Place chocolate chips & coconut oil in a small heavy-bottomed sauce pan over low heat
  2. Stir continuously with a silicon spatula being sure to combine well and not allow chocolate to stick or burn. About 3 minutes.
  3. When chocolate is melted, remove shortbread pan from freezer, pour warm chocolate over caramel layer, spread evenly.
  4. Return pan to freezer for at least 10 minutes or until chocolate sets.
  5. When set, carefully cut 16 squares. Use a large knife that you have wet with hot water, wipe the knife, and cut the bar in half, wet, wipe repeat cutting the halves in half etc... until you get 16 pieces. Do not saw the pieces, try to use the entire blade of the knife (a 10 or 12 inch chef's knife worked for me) and press downward evenly from the tip to the hilt in one sure steady downward stroke using your bodyweight for one quick cut through the length of the bar. This will prevent the chocolate and the shortbread from cracking and crumbling.


Thursday, March 18, 2021

Keto Double Chocolate Chip Peanut Butter Cookies


Gluten-free, Sugar-free! Yummy! Today is honeydew day... I have been doing (& cooking) all the things the honey (esposito) likes. First deviled eggs, then these cookies, and next cheeseburgers with cheddar, sriracha caramelized onions and a little iceberg lettuce salad with tomatoes and blue cheese dressing. 


Porque no?

These cookies are best eaten after they've cooled, they won't spread like other cookies, but if you like a slightly thinner crisper cookie, you can always add 1/2 stick of unsalted butter to the mixture - should you opt to do this be sure to cream the butter with the Swerve and peanut butter. 


Below you will see the cookies raw:


Then baked: 


I really don't need to blog this... it is super simple... 

Take a cup of natural chunky peanut butter (one made only with peanuts and salt - Whole Foods has a fab & cheap one) and mix it with 1/2 cup of powdered Swerve (a sugar substitute) and 1/4 cup of unsweetened cocoa powder (I use Ghirardelli), beat one large egg with a teaspoon of vanilla, add it into the peanut butter mixture, mix it in well, (I use a flexible spatula, but you can use the food processor for all this) fold in 1/3 cup of sugar-free dark chocolate chips, prepare a cookie sheet with parchment paper or a Silpat ( a silicon mat that I love using), roll the cookie dough into balls (about 10 balls), place the balls on the cookie sheet, giving them at least 1 inch of space between press them down slightly, reform them into rounds as necessary, stud each cookie with more chips if you like, then place in preheated oven for 10-12 minutes... let cool, voila! xo


But here we go:


Keto Double Chocolate Chip Peanut Butter Cookies


Preheat the oven to 350 degrees. Prepare a cookie sheet with either a Silpat or a sheet of parchment paper. 


Ingredients:

  • 1 cup of natural chunky peanut butter 
  • 2 tablespoons melted unsalted butter
  • 1/4 cup unsweetened cocoa powder
  • 1 teaspoon of baking powder
  • 1/2 cup powdered Swerve
  • 1 large egg (beaten)
  • 1 teaspoon vanilla
  • 1/3 cup sugar-free chocolate chips

Instructions:

  1. Mix peanut butter, butter, baking powder, 1/4 cup of unsweetened cocoa 
  2. Mix egg well with Swerve, and a teaspoon of vanilla
  3. Add it into the peanut butter mixture, mix it in well
  4. Fold in chocolate chips
  5. Roll the cookie dough into balls (about 10 balls)
  6. Place the balls on the cookie sheet, giving them at least 1 inch of space between press them down slightly, reform them into rounds as necessary, stud each cookie with more chips if you like
  7. Place in preheated oven for 10-12 minutes... let cool, voila!


Wednesday, March 17, 2021

Ketolicious Fudge Brownies with Peanut Butter Cheesecake and Strawberry Swirl


Whenever el esposito is feeling blue, I try to bake him back to life... and with the pandemic, the blues seem to visit him with greater frequency, this keto fudge brownie has all of his favorite flavors rolled into one. You can certainly play with the ingredients, and even layer them differently, but I kept it fairly straightforward, so that the integrity of each layer shone on its own, but all the flavors are of course delectable when combined into one luscious bite. 

I use powdered Swerve and brown Swerve (erythritol) for the brownie portion but you can use one or the other or substitute your own sweetener, just bear in mind that Swerve can be subbed in for sugar 1:1 - not true for all substitute sweeteners. Those of you who are not on the ketogenic diet can just use sugar, of course. I cut it into 9 pieces. Be sure to use a sharp slightly warm wet knife and wipe it down after each slice. It is VERY rich... more fudge than cake... the strawberry swirl brought a nice flash of brightness and much needed acidity... I added no sweetener to the berries before pureeing them. 


Ketolicious Fudge Brownies with Peanut Butter Cheesecake and Strawberry Swirl 


Preheat the oven to 350, prep an 8x8 inch enamel baking dish with parchment paper...
Make the brownie mixture first, then the cheesecake batter, then the strawberry puree. I used medium brown eggs because that's what I had, large eggs will be fine, it'll make the brownie slightly less dense than mine, but it'll still be plenty fudgey. You can, of course, prepare these batters by hand, or use a mixer. I used a food processor. 


For the brownie mixture 

Ingredients:

  • 3/4 cup of almond flour
  • 11 tablespoons (about 3/4 cup) unsweetened cocoa powder
  • 1 teaspoon of baking powder
  • 2 medium eggs 
  • 2 tablespoons of half and half (optional)
  • 4-1/2 oz of unsalted butter (1 stick plus 1 tablespoon)
  • 1/2 cup powdered Swerve
  • 1/4 cup brown Swerve

Instructions:

1) Combine the first three dry ingredients in a mixing bowl
2) Cream the butter and the sweeteners in a food processor until light and fluffy & the sweetener was well-incorporated (about 5 minutes, including scraping down the sides several times) 
3) Add the cocoa/almond flour mixture to the butter, combining until smooth (about 3-4 minutes  scraping down sides of bowl occasionally) 
4) Process the eggs into the brownie mixture one at a time until smooth, if it appears too thick, add the the half & half one Tablespoon at a time until you like the consistency
5) Smooth mixture into body of baking dish and prepare cheesecake batter


For the cheesecake batter

Ingredients 

  • 8 oz cream cheese ( room temperature)
  • 1/4 cup powdered Swerve
  • 1 medium egg
  • 1 teaspoon vanilla
  • 2 tablespoons unsweetened peanut butter
  • 1 teaspoon fresh lemon juice
  • 1/2 cup chopped strawberries (fresh or frozen and thawed) 

Instructions:

1) Whip cream cheese in a food processor until smooth (scraping sides of bowl with a flexible rubber spatula as necessary)
2) Add Swerve and process until sweetener is fully combined (scraping bowl as necessary)
3) Add peanut butter & process til smooth (scraping bowl as necessary)
4) Process egg into mixture (scraping bowl as necessary) 
5) Process vanilla and lemon juice
6) Dump batter atop the brownie batter and smooth
7) Without washing food processor bowl, add strawberries and puree until smooth 
8) Add dollops of strawberry puree atop cheesecake/brownie batter, then using a knife, run the the tip through the dollops of strawberry puree to create swirls
9) Bake in preheated oven for 25 minutes, center should still be jiggly
10) After 25 minutes turn off oven, crack open oven door, and let the cake cool completely
11) When completely cooled, chill in fridge for four hours minimum.


Tuesday, March 2, 2021

Ketolicious Sushi: Poke Uramaki Rolls with Cauliflower Sushi Rice


One of the foods I have missed most over the past four years since I have embarked on the ketogenic diet is sushi. I usually make poke bowls with salads, slaws, or cauliflower rice - chirashi sushi-style, but I really missed my favorite sushi bar delicacies, like nigiri and makimono. No more. I finally decided to start experimenting and figured out a good way to make it keto with cauliflower rice using traditional sushi rice seasoning. The cauliflower's flavor is mild and refreshing as a substitute. However, cauliflower rice has no starch so making it bind is a challenge, especially for uramaki (inside-out rolls). I have seen keto bloggers desperately attempt to use binders like cream cheese - a heinous bastardization of sushi which would alter the flavor profile considerably and ruin the delicate balance of this perennial all-star favorite. I make the cauliflower rice grains adhere better without weird additives that would detract from the sushi's clean taste and I had such fun creating all kinds of variations on the theme. But first a little sushi primer. For those of you less than interested in this retrospective, you can skip waaaay down to the recipe itself. 


Sushi is a Japanese dish of specially prepared rice (sushi-meshi) seasoned with vinegar, sugar and salt, combined with a variety of ingredients such as seafood  (often, but not exclusively, raw), vegetables, and even tropical fruits. Styles of sushi and presentation vary widely, especially here in the USA, but the key ingredient is "sushi rice",  also referred to as shari or sumeshi. 

It started its life eons ago circa 4 B.C. in Southeast Asia as a way of preserving fresh fish. At that time, cleaned, gutted and salted fish was kept in cooked rice because the natural fermentation process of the rice helped to preserve the fish. The reason for this is because when the rice begins to ferment, lactic acid bacilli is produced. This acid, combined with the salt, causes a reaction that slows the bacterial growth in fish. This process is also referred to as pickling or "tsuke-ba". This early form of sushi was called "Nare-zushi". After several months of fermentation, it was taken out of storage, the fermented rice was discarded and only the fish was consumed.  

Sushi later became a popular street food in Edo in the early 19th century where its preparation was simplified by an enterprising fishmonger named Hanaya Yohei into what subsequently came to be called nigiri-- hand-rolled freshly cooked and seasoned rice balls served with thin pristine fish slices atop, and by the early 20th Century, sushi found its way indoors at specialty bars/restaurants throughout Japan. It wasn't until the 1966 that sushi was sold in America. The first dedicated restaurant was opened in Los Angeles (of course), by the 1980s sushi bars had flourished in every major metropolis in the land, and, these days, it's as ubiquitous as pizza. There is now packaged sushi sold in practically every supermarket in the country. 


Sushi is often served with pickled ginger (gari), wasabi (or horseradish paste), and soy sauce (or tamari/shoyu). Daikon radish is popular as a garnish. Sushi is sometimes confused with sashimi, a Japanese dish consisting of thinly sliced raw fish, or meat eaten with a dipping sauce like soy sauce with wasabi paste or ponzu sauce (a citrus based sauce made by mixing soy sauce, lemon juice, rice vinegar, dashi, and mirin), served atop daikon and occasionally with a side of rice. Sashimi - technically, the word sashimi means "pierced body", where sashi = (pierced) and mi = (body, meat) - is naturally keto-friendly and I adore it, but it does require well-honed knife skills and fresh "sashimi-grade" fish. 

Of course, there really is no grading system for fish. Although there are no actual guidelines to determine if a fish is "sushi grade", the Food and Drug Administration (FDA) does have regulations in place for the proper handling procedures of fish meant for raw consumption. The FDA has provided information on the different times and temperatures required for a variety of species of fish to be deemed safe. These are the general guidelines for what the FDA calls “Parasite Destruction Guarantee” that must be followed for most fish species after they are caught:


  • Freezing and storing at an ambient temperature of -4°F (-20°C) or below for 7 days (total time)
  • Freezing at an ambient temperature of -31°F (-35°C) or below until solid and storing at an ambient temperature of -4°F (-20°C) or below for 24 hours
  • Freezing at an ambient temperature of -31°F (-35°C) or below until solid and storing at an ambient temperature of -31°F (-35°C) or below for 15 hours

The low temperatures kill the parasites that may be living in the fish when caught. However, this process needs to begin right away once the fish is on the boat. They must be caught quickly, bled and gutted upon capture, and frozen thoroughly in a flash freezer within 8 hours of leaving the water. There are a lot of steps that go into keeping a fish safe to eat raw, which is why there will always be a risk to eating raw sushi or sashimi. 

Some aspects of fresh fish include:
  • Smells of the seawater and not spoilage
  • Clear and slightly bulged eyes
  • Red gills
  • Firm flesh
  • Intact scales
  • Not slimy


Some fish are more susceptible to parasites than others, so it is important to be familiar with your fish species before just purchasing something with a sushi grade certification on it, especially if you intend on eating it raw. Here are the most common types of fish (excluding shellfish) used in raw sushi or sashimi.

  • Tuna. Tuna is considered to be one of the only species of fish that is safe enough to be consumed raw with minimal processing as it is highly resistant to parasites. This includes albacore, bigeye, bluefin, bonito, skipjack, and yellowfin tuna.
  • Salmon. If you are purchasing salmon for raw consumption, you should avoid wild caught and go with farmed salmon. Wild salmon spends a portion of its life in fresh water, where they are at a higher risk of contracting parasites. Aquacultured salmon is raised on a parasite-free diet and considered much safer to eat.
  • Yellowtail. You may find this listed as hamachi on a sushi menu under the Japanese name. It can be rather high in mercury, so it should be consumed in moderation.
  • Halibut/ Flounder. This may be listed as hirame in Japanese.
  • Gizzard Shad. This is also known as kohada.
  • Mackerel. This fish is also called saba or aji. Mackerel is usually treated with vinegar before serving and can be high in mercury.
  • Seabass. Also known as tai or suzuki, this fish is generally treated with vinegar before serving. It is high in mercury and should be eaten in moderation.
  • Farmed Fish. Fish that are raised in an aquaculture have a reduced risk of contracting parasites and are considered safer to consume raw.

It is important to note that freshwater fish should never be eaten raw as they are very prone to parasites. They should be cooked thoroughly to kill off the parasites before serving. 


The most popular type of sushi here in the USA is makimono, which literally translates to "wrapped things" or "scroll'. Makimono (also known as makizushi) consists of sushi rice and other ingredients generally wrapped in nori (thin sheets of seaweed), but is occasionally wrapped in a thin omelette, soy paper, cucumber or shiso (perilla) leaves. The roll is formed with the help of a bamboo mat called a makisu. The typical roll cuts into six or eight pieces, depending on the girth of the roll - in general, the thicker the roll, the thinner the slice, the more pieces per roll. There are different types of rolls:

  • Hosomaki Roll - ("Thin Roll" 1 inch in diameter and 1 ingredient)
  • Chumaki Roll - ("Medium Roll" 1 and 1/2 inches in diameter and 2 or 3 ingredients)
  • Futomaki Roll - ("Fat Roll" 2 to 2 and 1/2 inches in diameter and 4 or 5 ingredients)
  • Uramaki Roll - ("Inside-Out Roll" Rice on outside, Nori on inside and 2 to 3 ingredients)
  • Temaki Roll - ("Hand-Roll" Cone shaped roll)


Ketolicious Sushi: Poke Rolls with Cauliflower Sushi Rice 


So in order to make any basic keto sushi rolls, you will need a few staples. All of them are easily found in the average supermarket (or online) across the USA:

  1. Cauliflower rice (I use one 12 oz. package of frozen organic for 2 rolls)
  2. 8 oz of "Sushi grade" fish (I use 3-4 oz per roll)
  3. Rice vinegar (a mild vinegar made from rice)
  4. Mirin ( rice wine made for cooking - you can use Sake, instead)
  5. Wasabi (a green Japanese horseradish generally sold powdered)
  6. Nori (dried seaweed, 1 sheet per roll)
  7. Soy Sauce (for dipping)
  8. A bamboo sushi mat
  9. Cellophane (to wrap the sushi mat)
  10. A very sharp knife (I use a boning knife)
  11. Sushi vegetables (scallions, avocado, cucumber... whatever you like)
  12. Ginger
  13. Unflavored powdered gelatin (I use Knox brand)
  14. Powdered Swerve (or your favorite keto sweetener)
  15. Toasted Sesame Seeds
  16. Toasted Sesame Oil


To make the spicy rolls you'll need a few additional condiments:

  • Sriracha Sauce
  • Chili Garlic Sauce
  • Garlic cloves
  • Mayonnaise
  • Cilantro
  • Lime


There are many delectable variations of keto sushi-making that I will delve into on the next blog - like sashimi and avocado tostadas over sriracha aioli with ahi slaw in miso vinaigrette and poke beggars purses -  but for today, we will just focus on the makimonos: both the uramaki (inside out rolls with rice on the outside) and the Chumaki (regular rolls with seaweed outside rice inside). 

I use frozen organic cauliflower rice, but you can make fresh rice by pulverizing a chopped head of cauliflower in a food processor until grain-like bits of cauliflower are formed. 


Note: The preparation seems laborious but nothing here should intimidate you. It's just a matter of gathering, measuring, and chopping all of your ingredients. The only cooking, if you can call it that, is microwaving the cauliflower rice, draining it well (quite literally squeezing the water out of it with your bare hands or a cheesecloth) as soon as it has cooled enough to be handled, it is imperative you remove as much excess liquid as possible, and then placing it in a bowl and stirring in well the rice vinegar, mirin, Swerve,  salt, and powdered gelatin and then refrigerating it for half an hour to let the gelatin set.  Once the gelatin is set, you can remove the rice and allow to come to room temperature, so it is best to make the rice first, then prepare the poke sauce, then chop your fish. Keep your fish refrigerated until the last possible moment... it will keep it from growing bacteria and make it easier to slice.  The rest is a matter of assembly and rolling.

The bamboo sushi mat really helps to shape to roll, so while you can get away with not using one, you really should invest in it. You should take your time rolling and forming the makimono, gently pressing the sides of the filling back into the nori as you roll because the filling wants to escape.  

You will start by preparing the rice, while the rice is cooling prepare the poke sauce, after preparing the sauce prepare the fillings: fish, vegetables; mix the wasabi powder into a paste and set aside - it will need about 10 minutes to heighten its flavor; then be sure to have a towel and a small bowl filled with 1/4 cup water and 2 teaspoons rice vinegar (called the tezu) next to your sushi mat to dip your fingers and later your knife in as needed. 

There is an excellent video on Youtube that demonstrates the uramaki rolling process beautifully - the sushi chef (itamae) made California rolls which you might enjoy. It is the most popular roll in America, though not my favorite. I prefer eating crab other ways. Give it a look: 


This recipe makes 2 rolls. You can double, triple, or quadruple it. Just do the math;) 


For the cauliflower sushi rice:

Ingredients:

  • 12 oz. (1-1/2 cups) of frozen organic cauliflower rice (or the fresh equivalent)
  • 3 tablespoons rice vinegar
  • 1 tablespoon mirin (or sake)
  • 1 tablespoon powdered Swerve (or any sweetener you prefer)
  • 1/2 teaspoon pink Himalayan salt (or any salt you like)
  • 2 teaspoons unflavored powdered gelatin

Instructions:

  1. Microwave unopened bag of frozen cauliflower rice for 5 minutes and let rest for 1 minute (or follow rice manufacturer's suggestion for cooking)
  2. Carefully snip open top seam of the bag of cooked cauliflower and drain in a colander in the sink, until cool enough to handle. 
  3. While cauliflower cools, prepare sushi rice seasoning in a mixing bowl large enough to contain the rice. Mix the vinegar, mirin, Swerve, salt & gelatin, set aside near sink.
  4. When cauliflower is cool enough to touch, grabbing one handful at a time, squeeze all the excess liquid out of each handful, placing the drained rice into the bowl with sushi seasoning. (You can alternatively use a cheesecloth to remove excess liquid. I'm tactile... I like using my hands.)
  5. When all the rice is drained of excess liquid, stir the seasoning and the rice well to make sure to coat each grain of rice. You can adjust seasoning to determine whether the rice is sweet/salty/tangy enough to suit your taste. 
  6. Place rice in refrigerator for 30 minutes to allow gelatin to set. Remove from refrigerator and prepare poke sauce.


For the poke sauce:

You can adjust the ingredients to suit your palate. These are what I used, but you are not me. Just be sure to keep a balance of flavors in mind if you adjust. I wouldn't usually add mayonnaise to poke, but in this instance an aioli is necessary to thicken the sauce to make it creamier and more binding since we are going to place it inside a roll and, without the mayo, the sauce would be too wet and liquidy - the texture of the rice and the nori would suffer. The cauliflower rice is already wet enough. Fresh ginger has a bit of heat (an assertive bite which I like), but it can be overwhelming for some palates, so feel free to grate it, rather than mince it. It will be subtler that way. 

Ingredients: 

  • 1/2 Tablespoon of Chili Garlic sauce (Sambal Oelek or your favorite: sugar-free, starch-free chili sauce)
  • 1 teaspoon of Sriracha Sauce
  • 1/3 cup of mayonnaise
  • 1 clove of garlic, finely minced
  • 1 half-inch knob of fresh ginger root, finely minced
  • a few sprigs of cilantro, finely minced
  • 2 scallions, finely minced
  • 1 Tablespoon of rice wine vinegar
  • 1 Tablespoon of low-sodium soy sauce
  • 1 teaspoon of sesame oil
  • juice from half a lime

Instructions:

Whisk all the ingredients well in a bowl. Set aside. 


For the Uramaki ("inside-out") rolls:

Ingredients:

  • 8 oz "sashimi-grade" fish, finely diced and placed in a bowl
  • 2 scallions, julienned lengthwise
  • 1/2 avocado, sliced
  • 1/4 cup (or more) Toasted Sesame Seeds, White & Black
  • 1-1/2 cups prepares cauliflower sushi rice (recipe above)
  • poke sauce (recipe above)
  • 2 sheets of roasted nori (8-1/4 by 7-1/4 inch)
  • bamboo sushi mat wrapped in cellophane
  • 1 tablespoon wasabi powder mixed with water into a paste, rolled into ball (for service)
  • low sodium soy sauce (for service)


Instructions


  1. Mix cubed fish with half the poke sauce.
  2. Place sushi mat with cellophane on work surface with slats running crosswise. Arrange 1 sheet nori, shiny side down, on mat, lining up a long edge of sheet with edge of mat nearest you. Using damp fingers, gently press 1/2 of rice onto nori in 1 layer, leaving a 1 3/4-inch border on side farthest from you. Sprinkle with sesame seeds.
  3. Flip the nori and rice over so that the nori is now the top layer. Make a thin line of scallion along the nori 1 to 2 inches from the edge closest to you. Place a thin line of avocado over the scallion. Spoon half the spicy tuna mixture over the veggies.  Grab the bottom edge of the bamboo mat while keeping the fillings in place with your fingers, roll into a tight cylinder. Lift the edge of the bamboo mat and continue to roll it forward while keeping gentle pressure on the mat. Roll tightly but gently, using the sushi mat to guide you. Finding your sushi falling apart easily? Maybe because you don’t squeeze the sushi rolls tightly enough. You have to tuck in and pull the bamboo mat while you roll. Also after you finish rolling, place the bamboo mat over the sushi roll and gently squeeze the sushi roll over the bamboo mat.
  4. With a very sharp knife, cut the roll in half and then cut each half into 3 pieces. Clean the knife with a damp cloth and dip it in the tezu after every few cuts. When you cut sushi rolls, dip your fingers in Tezu or you can cover the roll with plastic, so the rice won't stick to your hands, but I don't like the idea of tiny pieces of plastic possibly adhering to the roll. 
  5. Repeat instructions 1-4 to make the next roll (you can of course, just make a regular roll with the nori on the outside and save a step)
  6. Arrange your rolls decoratively on a plate and add a dollop of the spicy sauce atop for further garnish. Serve each roll with wasabi and a dish of soy sauce.


    Meshiagare!!!